
Main Takeaway: Securing a cardboard bale correctly is essential for safe handling, storage, and transportation. Whether using baling wire, polypropylene twine, or steel strapping, following structured preparation, tying, and finishing steps will ensure the bale remains intact and manageable.
1. Introduction to Cardboard Baling
Cardboard bales consist of flattened, compressed stacks of cardboard boxes or sheets bound tightly into a dense rectangular bundle. These bales:
- Reduce storage space by up to 80% compared to loose cardboard.
- Simplify transport, loading, and unloading.
- Enable more efficient recycling and reuse.
Properly tying a cardboard bale prevents it from loosening, spilling, or shifting during handling. This guide covers:
- Equipment and materials needed
- Pre-baling preparation
- Methods of tying: baling wire, polypropylene twine, and steel strap
- Step-by-step procedures for each method
- Safety precautions and best practices
2. Equipment and Materials
Choosing the right binding material depends on bale size, weight, and available equipment. Common options include:
- Baling wire: Zinc-coated steel wire, highly durable, for medium to large bales.
- Polypropylene twine: Lightweight, cost-effective, for small to medium bales.
- Steel strapping: High-strength metal bands, for the heaviest, industrial bales.
In addition, you will need:
- Cord cutter or wire cutters (for twine or wire)
- Baler or compression device (mechanical or hydraulic)
- Binding tools:
- Wire twister or pliers (for baling wire)
- Tensioning tool and sealer (for steel strap)
- Knotting tool (optional, for twine)
- Protective gear: Gloves, safety glasses, and steel-toed boots
3. Pre-Baling Preparation
Before tying, proper preparation ensures the bale is uniform, stable, and free of contaminants:
- Sort and flatten cardboard
- Remove non-cardboard materials: staples, tape, labels.
- Break down boxes completely; flatten along the scored lines.
- Clean workspace
- Clear floor area of debris to avoid tripping hazards.
- Position bale press or compression area on level ground.
- Assemble equipment
- Inspect binding materials for frays, rust, or damage.
- Ensure tools are clean and in good working condition.
- Plan bale dimensions
- Standard commercial bale dimensions:
- 48 in × 40 in × 36 in (length × width × height) for 1,000 lb bale.
- 45 in × 48 in × 36 in for 1,200 lb bale.
- Confirm bale weight and size based on recycling facility guidelines.
- Standard commercial bale dimensions:
4. Tying Methods
4.1 Baling Wire
Advantages: High tensile strength; minimal stretch; durable. Disadvantages: Requires pliers or wire twister; sharper edges; heavier.
4.1.1 Materials
- 12-gauge zinc-coated baling wire
- Wire twister or lineman’s pliers
- Wire cutters
4.1.2 Steps
- Position the coil
- Unwind approximately 3 ft of wire from the coil.
- Lay the wire loosely across the top of the compressed bale.
- Wrap the wire
- Loop the wire under the bale from one side to the other.
- Bring both ends to the top of the bale, parallel and taut.
- Twist and tighten
- Using a wire twister, grip both ends and twist clockwise 6–8 times.
- If using pliers, cross the ends, grip firmly, and twist until tight.
- Secure ends
- After twisting, bend the sharp ends inward to prevent injury.
- Cut off excess wire with wire cutters, leaving ~3 in of twisted section.
- Repeat binding
- Standard practice uses at least three wires: two along the width and one lengthwise.
- Space wires evenly: one at ¼ height from top, one at midpoint, one at ¼ height from bottom.
4.2 Polypropylene Twine
Advantages: Lightweight; easy knotting; minimal equipment. Disadvantages: More stretch; less strong than steel; may degrade in sunlight.
4.2.1 Materials
- 4-ply polypropylene baler twine (minimum 200 lb breaking strength)
- Sharp scissors or cord cutter
- Optional knotting tool
4.2.2 Steps
- Measure twine length
- Cut a piece approximately four times the bale’s perimeter; e.g., for 48 in × 40 in bale, twine ≈ (2 × 48 + 2 × 40) × 4 ≈ 688 in (57 ft).
- Initial wrap
- Center twine on top of bale; bring ends under and up to meet on the far side.
- Tension and knot
- Pull ends tightly to compress bale further.
- Tie a double bowline knot or water knot:
- Create a loop (“bight”), pass working end through loop, around standing part, back through loop.
- Tighten until snug.
- Cross wraps
- Repeat two more bindings: one along the second axis (perpendicular), one at diagonal if added stability is desired.
- Ensure each knot is tucked under the twine to lock.
- Trim ends
- Cut off excess twine, leaving 2–3 in for ease of handling.
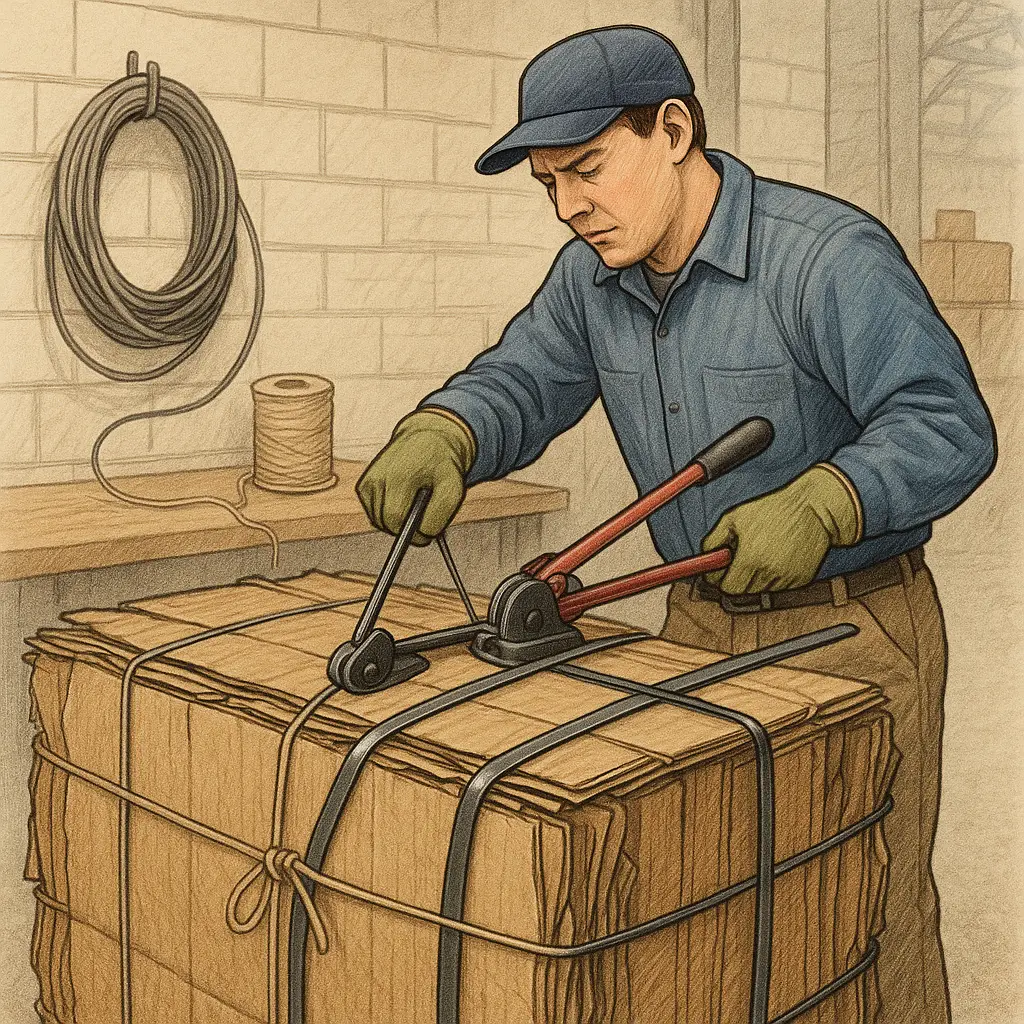
4.3 Steel Strapping
Advantages: Exceptional strength; minimal stretch; suitable for heavy-duty bales. Disadvantages: Requires specialized tools; risk of strap recoil.
4.3.1 Materials
- ½ in wide, 0.020 in thick galvanized steel strap
- Tensioning tool
- Sealer/crimper and seal clips
- Strap dispenser (optional)
- Metal shears for trimming
4.3.2 Steps
- Position strap
- Place the strap dispenser at bale side. Pull strap around bale, overlapping ends by 6–8 in.
- Apply seal clip
- Slide a metal seal clip onto overlapping ends. Position clip midpoint across overlap.
- Tension strap
- Insert strap ends into tensioning tool jaws.
- Turn tensioner handle clockwise until strap is taut and bale is secure.
- Crimp seal
- Use the sealer/crimper to compress the seal clip fully, locking strap ends.
- Ensure crimp is centered, with no loose edges.
- Cut and tuck
- Use metal shears or the tensioner’s cutter to trim excess strap close to the seal.
- Tuck remaining strap end under bale or clip for safety.
5. Safety Precautions
- Personal Protective Equipment (PPE): Always wear gloves to protect from wire or strap edges, safety glasses for flying debris, and steel-toed boots.
- Controlled tensioning: Never over-tighten; this can crush the bale unevenly or snap the wire/strap, causing recoil injuries.
- Secure work area: Keep bystanders clear. Coil excess wire/twine away from feet to prevent tripping.
- Proper disposal: Collect all wire trimmings and strap remnants for recycling or safe disposal; loose pieces pose puncture hazards.
6. Best Practices and Troubleshooting
- Consistent bale dimensions: Aim for uniform size to stack bales efficiently and avoid uneven pressure on straps or wire.
- Check bind integrity: Before moving a bale, visually inspect each binding point; test by gently pushing on corners.
- Weather considerations: Poly twine degrades under UV exposure—store bales indoors or use UV-resistant twine.
- Equipment maintenance: Regularly oil tensioners and replace worn blades on cutters to ensure clean cuts and consistent tension.
- Alternate bindings: For very small bales (under 200 lb), plastic stretch wrap may supplement twine for surface stability.
7. Environmental and Cost Considerations
- Material selection: While steel strapping offers strength, it is costlier and less recyclable by small facilities. Poly twine is inexpensive but less durable. Baling wire often strikes the best balance of cost, strength, and recyclability.
- Recycling of binding materials: Many recycling centers accept steel wire and strap as scrap metal. Check local guidelines to minimize landfill waste.
- Labor and time efficiency: Automated balers with built-in tying mechanisms can reduce manual labor by up to 70%, offsetting upfront equipment costs.
8. Conclusion
Tying a cardboard bale effectively requires the right combination of binding material, tools, and technique. Whether using baling wire, polypropylene twine, or steel strapping, the critical steps are:
- Prepare clean, flattened cardboard and workspace.
- Compress evenly to target bale dimensions.
- Bind securely with multiple wraps, ensuring even tension.
- Inspect and adjust for safety and compliance.
By adhering to these detailed procedures and safety measures, operations can achieve efficient, safe, and cost-effective cardboard bale management—benefiting warehousing, recycling, and transport processes alike.
Leave a Reply