
Moving a cardboard baler is a complex task that demands meticulous planning, careful preparation, proper equipment, and attention to safety. Cardboard balers are heavy, bulky machines used in recycling facilities, warehouses, retail stores, and manufacturing plants to compress and bind cardboard waste into manageable bales. Whether you’re relocating a baler within the same facility, installing it at a new site, or reconfiguring your production line, this guide will walk you through each step required to move a cardboard baler safely and efficiently.
1. Understanding the Cardboard Baler
Before embarking on the move, it’s crucial to understand what a cardboard baler is and why moving one requires special considerations.
- Weight & Dimensions Cardboard balers vary in size and weight. A small vertical baler might weigh 1,500–2,500 lb, while larger horizontal or industrial units can weigh upwards of 10,000 lb. Knowing your baler’s exact weight and footprint is the first step toward safe handling.
- Types of Balers
- Vertical Balers: Compact footprint, baling chamber oriented vertically. Often used in smaller operations.
- Horizontal Balers: Larger capacity, horizontal chamber, often semi-automated or fully automated.
- Automatic vs. Manual: Some balers automatically cycle once loaded; others require manual cycling.
- Key Components
- Baling Chamber: Where cardboard is compacted.
- Hydraulic System: Pumps pressure into the ram.
- Ram Plate: Compresses the material.
- Door & Latch System: Secures the chamber during compression.
- Control Panel: Houses electrical and hydraulic controls.
2. Preliminary Planning
2.1 Site Survey and Route Planning
- Measure Access Routes: Confirm door widths, hallway dimensions, and clearances. Include overhead clearances (door headers, ceiling heights) and floor load capacity.
- Identify Obstacles: Note fixed equipment, columns, ramps, thresholds, and drain covers.
- Verify Floor Rating: Ensure the floor can support the baler’s weight plus any moving equipment and crew.
- Plan the Path: Create a diagram illustrating the move path, marking turning radii, staging areas, and final placement.
2.2 Obtain Technical Documentation
- Manufacturer’s Manual: Review the operator and installation manuals for weight distribution, lifting points, and disassembly recommendations.
- Electrical & Hydraulic Schematics: Document connections that need to be disconnected and later reconnected.
2.3 Permits & Site Access
- Building Permits: If moving between buildings or through public corridors, secure necessary permits.
- Facility Coordination: Notify maintenance, safety, and operations teams. Schedule downtime to disconnect utilities and halt production if required.
3. Disconnection and Preparation
3.1 Power and Utilities
- Lockout/Tagout (LOTO): Follow OSHA‐compliant LOTO procedures. De‐energize electrical power at the main disconnect, and tag the circuit.
- Hydraulic Lines: Relieve hydraulic pressure by cycling the controls into the “open” position with power off. Cap hoses to prevent fluid leakage.
- Pneumatic Lines (if applicable): Drain air pressure and disconnect fittings.
3.2 Clearing and Securing the Baler
- Empty the Chamber: Remove any cardboard bales and stray debris to reduce weight and prevent hazards.
- Secure Moving Parts:
- Close and latch the chamber door.
- Block or brace the ram in its home position to prevent unexpected movement.
- Remove Accessible Attachments: Any ancillary units—ram extension racks, feed hoppers, or conveyor attachments—should be detached and packaged separately.
3.3 Mark Lifting Points
- Lifting Lugs & Fork Pockets: Most balers are equipped with forklift pockets or lifting lugs. Mark these clearly with chalk or tape.
- Center of Gravity: Identify the approximate center of gravity to maintain balance during lifting.
4. Selecting Equipment and Crew
4.1 Equipment Requirements
- Forklifts: Industrial forklifts rated for at least 1.2× the baler’s weight.
- Pallet Jacks: For smaller balers (under 3,000 lb) on smooth, level surfaces.
- Skates & Rollers: Heavy-duty machinery skates that can be placed under the baler feet for manual jig‐and‐shove movements.
- Load Bars & Lifting Straps: Adjustable ratchet straps rated above the load weight. Use load bars to distribute weight evenly.
- Cranes or Hoists: If the baler must be lifted vertically or moved over obstructions. Ensure crane capacity and boom reach match requirements.
- Dollies with Brake: Mechanical dollies with locking brakes to stabilize loads.
4.2 Assembling the Crew
- Qualified Operators: Forklift and crane operators with OSHA certification.
- Rigging Specialists: Personnel trained in proper rigging and slinging techniques.
- Signal Person: A dedicated spotter to coordinate movements and signal operators.
- General Laborers: For skate placement, strap tensioning, and path clearing.
- Safety Officer: Monitors compliance with safety protocols throughout the move.
5. The Moving Process
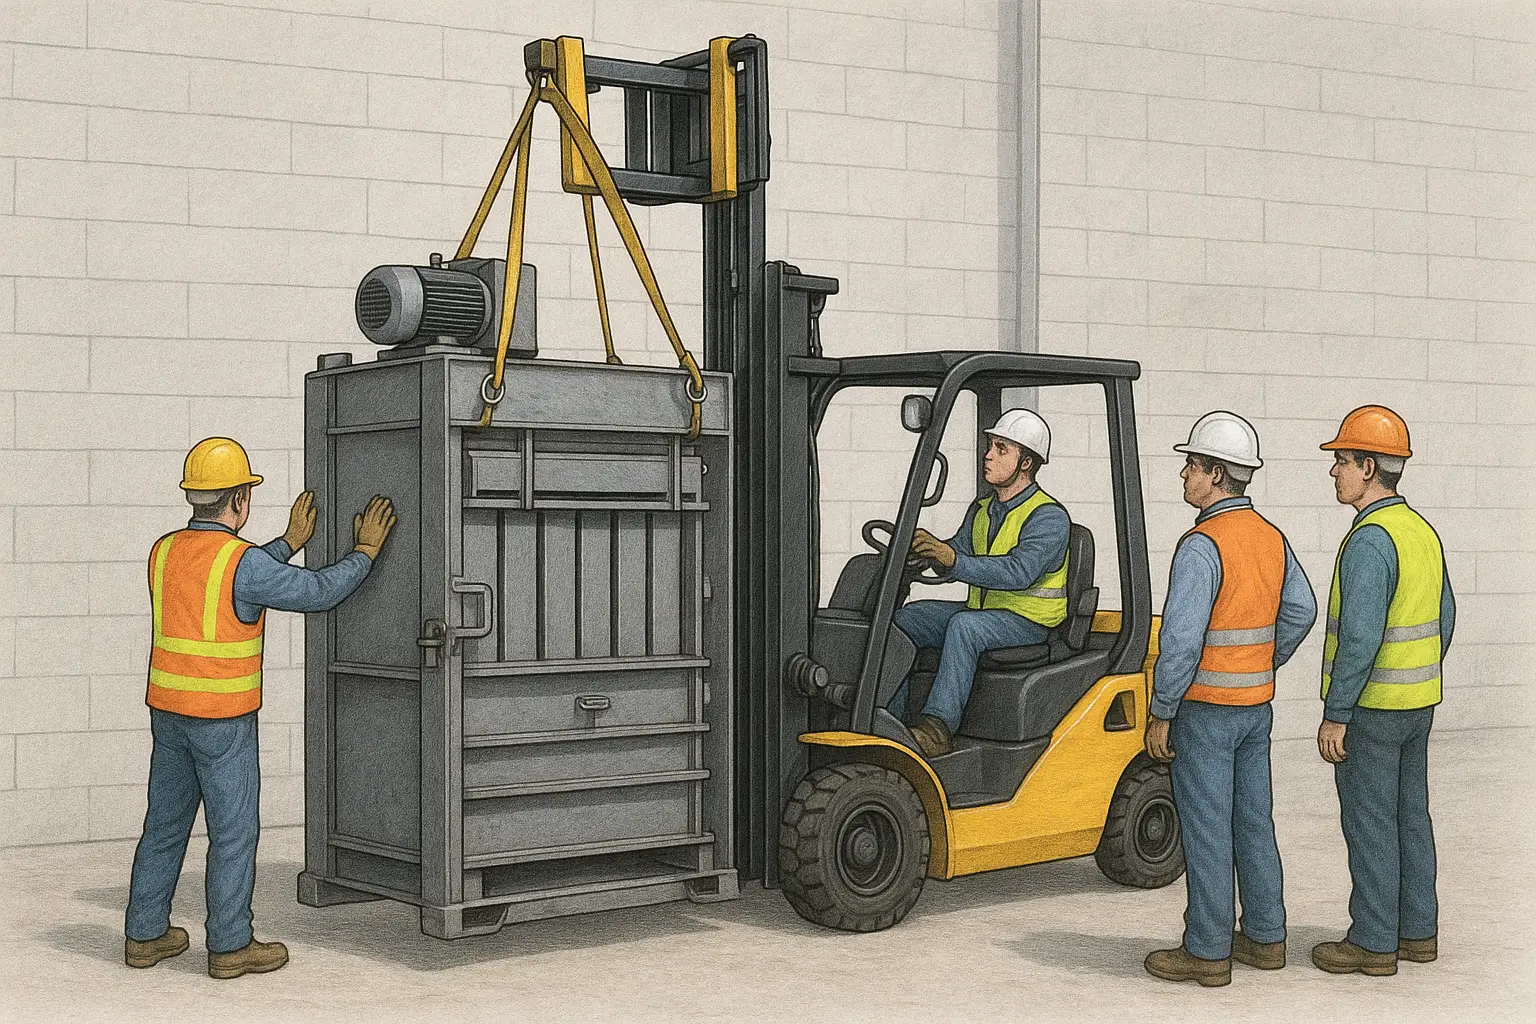
5.1 Rigging and Lifting
- Position Equipment
- Stage the forklift or crane close to the baler, ensuring a straight lift path.
- Place skates or a sturdy platform under the baler feet if using manual methods.
- Attach Lifting Straps
- Loop lifting straps around the baler’s designated lifting lugs or under sturdy frame members.
- Ensure straps avoid sharp edges and are not twisted.
- Lift Slowly
- Use smooth, controlled motion to lift the baler slightly off the floor, just enough to clear any floor hardware.
- Pause and inspect strap tension and balance.
- Balance Check
- Verify the baler remains level. Adjust straps or forklift forks if significant tilt appears.
- Hold and Inspect
- Hold the baler in the raised position (6–12 inches) for 20–30 seconds. Check for shifting, unusual noises, or material stress.
5.2 Transportation Across Floor
- Forklift Method:
- Slowly drive the forklift along the planned route. Maintain low speed (1–2 mph).
- Engage travel brakes on dollies or skates to avoid runaway loads on inclines.
- Dollies & Skates Method:
- Lean the baler forward or back slightly to insert skates under corners.
- Use pry bars or lift jacks to inch the baler onto the skates.
- Guide the load manually, using load bars to push or pull.
- Advance one skate at a time: shift the hind skates to the front periodically.
- Crane or Hoist Method:
- Slowly travel the crane’s trolley along an overhead beam if available.
- Coordinate hoist and trolley movement via radio communication.
5.3 Negotiating Obstacles
- Doorways:
- If necessary, temporarily remove door frames or sashes.
- Use trailing sling to guide the load and protect door edges.
- Ramps & Inclines:
- Always move with the forklift facing uphill when carrying a load.
- Chock wheels on dollies to prevent rollback.
- Tight Corners:
- Use pivot lifts: raise the load, pivot 90°, reposition equipment, then lower and continue.
- Maintain communication between the driver and signal person.
5.4 Placing the Baler
- Final Position Alignment
- Slowly lower the baler onto its designated footprint. Ensure leveling feet align with pre‐installed anchor bolts or floor plates.
- Leveling & Anchoring
- Use precision machinist’s level across multiple axes (front‐to‐back, side‐to‐side).
- Adjust leveling feet or shims until the baler sits plumb within ±0.25° tolerance.
- Torque anchor bolts to manufacturer specifications.
- Remove Rigging
- Detach straps, slings, and forklift forks.
- Verify no damage to lifting points or frame.
6. Reconnection, Testing, and Commissioning
6.1 Reconnecting Utilities
- Electrical
- Reapply lockout/tagout procedures in reverse: Remove tags, energize circuits, and test control panel lights.
- Hydraulic
- Reconnect hoses, tighten fittings to recommended torque, and fill reservoirs with manufacturer‐specified hydraulic fluid.
- Bleed air from the system: run the pump at low pressure while cycling the ram until fluid is free of bubbles.
- Pneumatic (if applicable)
- Reattach air lines and regulators, then pressurize slowly while listening for leaks.
6.2 Operational Testing
- Control Panel Check
- Power on the baler; verify indicator lights illuminate and error codes clear.
- No‐Load Cycle
- Run the baler through one full cycle without cardboard. Ensure the ram descends and retracts smoothly, doors latch/release correctly, and safety interlocks function.
- Test Bale
- Process a small quantity of scrap cardboard. Bind the bale and eject it. Confirm bale density, wire tie placement, and ejection clearance.
6.3 Safety & Performance Verification
- Emergency Stop Test
- Trigger the emergency stop button during a cycle; verify immediate hydraulic cutoff.
- Interlock Check
- Open the door mid‐cycle (with safety guards engaged); machine should not cycle.
- Operator Training
- Review new location layout, update emergency exit routes, and train staff on any new procedures associated with the move.
7. Safety Considerations and Best Practices
Moving a cardboard baler poses significant risks. Adhering to best practices prevents injury and equipment damage.
- Personal Protective Equipment (PPE)
- Hard hats, steel‐toe boots, high‐visibility vests, gloves, and safety glasses.
- Clear Communication
- Use two‐way radios or standardized hand signals. Designate a single signal person.
- Area Barricading
- Rope off the move area. Post “Caution: Heavy Equipment Moving” signs.
- Load Monitoring
- Continuously monitor the load’s stability. Never exceed forklift or hoist capacity.
- Emergency Planning
- Develop procedures for equipment failure, oil spills, or injuries. Keep a spill kit and first‐aid supplies nearby.
- Documentation
- Record pre‐move inspections, LOTO logs, and post‐move certifications.
8. Troubleshooting Common Issues
- Load Shifting During Lift
- Cause: Incorrect center‐of‐gravity calculation or loose straps.
- Solution: Lower load, adjust sling placement, and re‐lift gradually.
- Baler Ram Sticking Post-Move
- Cause: Air trapped in hydraulic lines or misaligned frame.
- Solution: Bleed the system thoroughly; verify frame alignment and shimming.
- Uneven Bales After Installation
- Cause: Baler not level or floor settlement.
- Solution: Re‐level machine and re‐anchor; check floor slab integrity.
- Hydraulic Leaks
- Cause: Vibration‐induced loosening of hose fittings.
- Solution: Retorque fittings; replace degraded hoses; inspect internal seals.
9. Cost and Timeline Considerations
9.1 Cost Factors
- Equipment Rental: Forklift, crane, or dollies (approx. $200–$500/day).
- Labor: Skilled movers, riggers, and operators (approx. $75–$150/hour each).
- Permits & Inspections: Varies by jurisdiction ($100–$1,000).
- Downtime: Lost production if the baler is offline (calculated by facility throughput).
9.2 Estimated Timeline
| Phase | Duration |
|---|---|
| Planning & Permits | 1–2 weeks |
| Disconnection & Prep | 4–8 hours |
| Moving & Rigging | 2–6 hours |
| Reconnection & Testing | 4–6 hours |
| Total (excluding permits) | 1–2 days |
10. Conclusion
Moving a cardboard baler is a multifaceted project that encompasses careful planning, disciplined safety practices, appropriate equipment selection, and skilled execution. By thoroughly surveying the site, following lockout/tagout procedures, employing certified riggers and operators, and adhering to step-by-step rigging and installation protocols, you can minimize risk, avoid costly downtime, and ensure that your baler operates at peak efficiency in its new location.
Proper documentation, post-move testing, and staff training complete the process—guaranteeing that the relocated baler serves your recycling or production needs reliably for years to come.
Leave a Reply