
Key Takeaway: Proper operation and maintenance of a cardboard baler maximizes compaction efficiency, minimizes downtime, and enhances workplace safety. Understanding the machine’s mechanics, following safety protocols, and adhering to recommended procedures for loading, compacting, and emptying are essential for effective use.
1. Introduction
Cardboard balers are industrial machines designed to compress and bind bulky cardboard waste into dense bales for efficient storage, transportation, and recycling. Widely used in retail stores, warehouses, distribution centers, and manufacturing facilities, they reduce waste volume by up to 90%, lower hauling costs, and streamline recycling operations.
This guide details:
- Mechanical principles of a cardboard baler
- Key safety considerations
- Step-by-step instructions for operation and emptying
- Routine maintenance and troubleshooting tips
2. How a Cardboard Baler Works
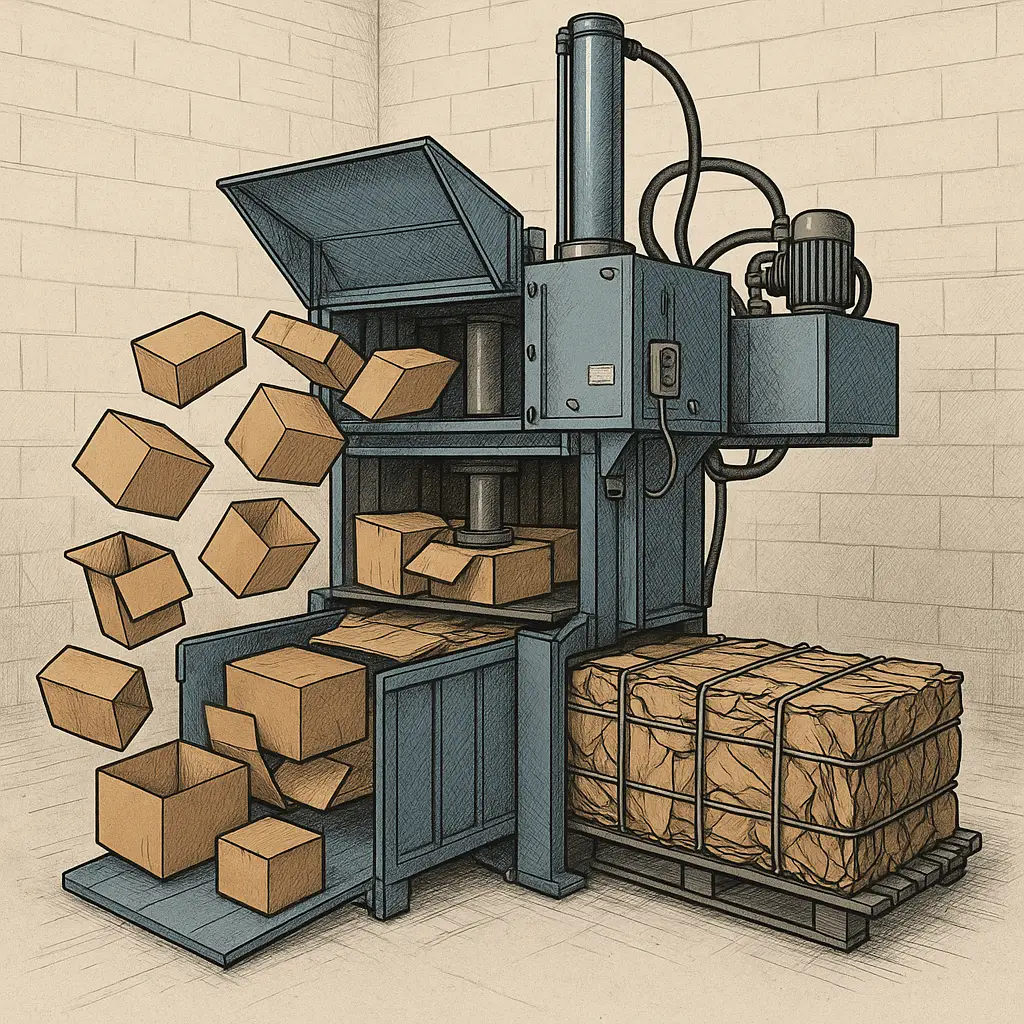
Cardboard balers employ hydraulic force to compress material within a chamber. Core components include:
| Component | Function |
|---|---|
| Hydraulic Cylinder | Generates compressive force (typically 10–20 tons) to compact cardboard against a platen |
| Baling Chamber | Enclosed space where cardboard is stacked for compaction |
| Compression Platen | Steel plate driven by hydraulic cylinder that applies pressure to material |
| Door or Gate | Provides access for loading cardboard and removing finished bale |
| Control Panel | Houses start/stop buttons, emergency stop, pressure gauge, and cycle selector |
| Tie-Off Station | Location for securing baling wire or strapping around the compressed bale |
Principle of Operation:
- Loading: Cardboard is placed into the baling chamber.
- Compression: Activating the cycle moves the platen forward, compressing material to a preset pressure or stroke.
- Binding: After retraction, the operator applies wire or strapping to secure the bale.
- Ejection: The completed bale is expelled or manually removed through a side or front door.
3. Safety Precautions
Operating a baler involves high pressures and moving steel parts. Prioritize safety by following these guidelines:
- Lockout/Tagout (LOTO): Always de-energize and lock out hydraulic power before maintenance or clearing jams.
- Personal Protective Equipment (PPE): Wear safety goggles, steel-toe footwear, gloves, and hearing protection.
- Emergency Stops: Familiarize yourself with emergency-stop buttons on the control panel.
- Clear Work Area: Keep area around baler free of debris and ensure no obstructions hinder bale removal.
- Proper Training: Only trained personnel should operate or service the baler.
4. Types of Cardboard Balers
Different baler configurations suit varying volumes and layouts. Comparison:
| Type | Description | Ideal For |
|---|---|---|
| Vertical Baler | Vertical loading, smaller footprint, manual bale removal via bottom door | Low to moderate waste volumes, limited space |
| Horizontal Baler | Horizontal feed, automatic tying and ejection, larger capacity | High-volume operations, warehouses, distribution |
| Two-Ram Baler | Separate compression and ram-to-bale mechanisms for dense bales | Very high volumes, recycling centers |
5. Preparing to Use a Cardboard Baler
- Inspect the Machine: Check hydraulic oil levels, hoses for leaks, platen alignment, and door latches.
- Verify Controls: Test start, stop, and emergency-stop functions. Confirm pressure gauge reads zero.
- Gather Materials: Have baling wire, strapping, or plastic ties at the tie-off station.
- Clear Surroundings: Ensure no slip or trip hazards exist near the baler entrance and bale exit area.
6. Operating a Cardboard Baler
6.1 Loading Cardboard
- Flatten Boxes: Break down cartons to reduce voids.
- Stack Evenly: Place material evenly across the baling chamber to ensure uniform compaction.
- Don’t Overfill: Keep load below the maximum fill line—typically marked inside the chamber.
6.2 Starting the Compression Cycle
- Close and Secure Door: Engage door interlock to enable hydraulic operation.
- Select Cycle Mode: Use “single cycle” for one compression stroke or “continuous” for repeated strokes until pressure setpoint.
- Activate Cycle: Press the cycle start button. The platen advances, compressing material.
- Monitor Pressure: Watch pressure gauge; machine will stop when target pressure or stroke count is reached.
6.3 Applying Bale Ties
- Retract Platen: After compression, the platen retracts to allow tie access.
- Open Door: With power off or in neutral position, open the door or gate.
- Place Ties: Thread wire or strap under and around the compressed bale—top, middle, and bottom.
- Secure Ties: Use tensioning tools or manual knotting to firmly bind the bale.
6.4 Ejecting the Finished Bale
- Locate Release Mechanism: Some balers have an automatic ejection lever; others require manual pulley or slide removal.
- Remove Bale: Slide or push the bale out of the chamber into the staging area.
- Inspect Bale: Confirm ties are secure and bale shape meets hauling requirements.
7. How to Empty (Unload) a Cardboard Baler
Emptying refers to removing the completed bale and preparing for the next cycle. Detailed steps:
- Stop Operations: Ensure the cycle is complete and the platen is fully retracted.
- Open Door Safely: Use designated handles; avoid placing hands near the platen.
- Eject Bale: Engage ejection controls—often a hydraulic lever or manual bar—to push the bale out.
- Clear Residual Debris: Check the chamber floor for loose scraps; sweep out small pieces to prevent jams.
- Close and Lock Door: Ready the baler for the next load.
8. Preventive Maintenance
Routine maintenance prolongs machine life and prevents breakdowns:
- Daily Checks: Inspect for leaks, clean around door gaskets, and ensure controls respond properly.
- Weekly Tasks: Lubricate hinge points, check wire guides for wear, and verify hydraulic oil temperature.
- Monthly Inspections: Examine hydraulic hoses, pressure relief valves, and electrical connections.
- Quarterly Service: Replace hydraulic oil and filters, adjust pressure settings to manufacturer specs.
9. Troubleshooting Common Issues
| Symptom | Possible Cause | Recommended Action |
|---|---|---|
| Platen won’t move | Hydraulic pump failure | Check power supply, test pump pressure, replace pump |
| Low compaction force | Oil level low or worn seals | Refill oil, replace seals |
| Ties slip off bale | Insufficient tension | Inspect tensioner tools, ensure correct tie material |
| Excessive cycle time | Material jam or overload | Clear jam, reduce load size |
| Slow return stroke | Faulty relief valve | Clean or replace relief valve |
10. Best Practices and Efficiency Tips
- Pre-Sort Cardboard: Remove contaminants (plastic, metal) to avoid jamming and ease recycling.
- Batch Loading: Group similar cardboard sizes to maximize fill density.
- Schedule Maintenance: Align service intervals with production downtime to minimize interruption.
- Train Staff: Provide refresher training on safety and troubleshooting to keep operations smooth.
11. Environmental and Cost Benefits
Effectively using a baler yields measurable benefits:
- Waste volume reduction up to 90%
- Lower transport and disposal costs by reducing pick-up frequency
- Enhanced recycling stream purity, leading to higher rebate rates
- Decreased storage footprint, freeing valuable floor space
12. Conclusion
Mastering the operation, emptying, and maintenance of a cardboard baler ensures safe, efficient, and cost-effective waste management. Adherence to safety protocols, proper machine handling, and regular upkeep will maximize productivity, reduce downtime, and contribute positively to your facility’s environmental goals.
Leave a Reply